Lesson 4

TOOLS OF THE TRADE

small baby

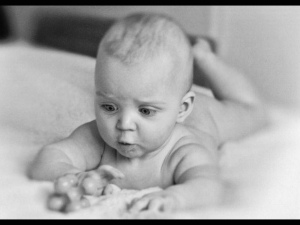
When a small child is born it has little motor control over its limbs and head. Over a period of months, the child starts to gain momentum and control in the movements. It usually starts with their hands. First, they will look at the hand and move the fingers slowly. Once this process starts, it gets better and better with time. Each child has their opportunity to attempt many eye pokes and pull wads of hair.

So how does this help us to draw? Hand-eye co-ordination is conducive to drawing. If you see it, but your hand does not do what you want it to do, the movement has no value.

WE Can learn hand-eye

co-ordination.

Anything that requires precision with your hands and eyes.

When my daughter started scribbling at one year old I noticed it was unique. She did not scribble. she carefully and slowly created small circular shapes. Hand-eye co-ordination at such an early year was there. I went home to see what I had done when I was younger. My mother kept all our school projects but finally removed them 6 months before I arrived. I monitored the next child and It was not the same. But when my daughters first born was nearly 1 yr old, I noticed the same style. And yet all my children can draw well.

What helped them and others is the DESIRE to LEARN MORE. WE Can learn hand-eye co-ordination

  1. Cutting detail shapes with scissors.
  2. Tracing pictures accurately.
  3. Making models…etc.
  4. Taking time to examine things closely. [ I will post later ]

There is a number of things that can help us improve our skills

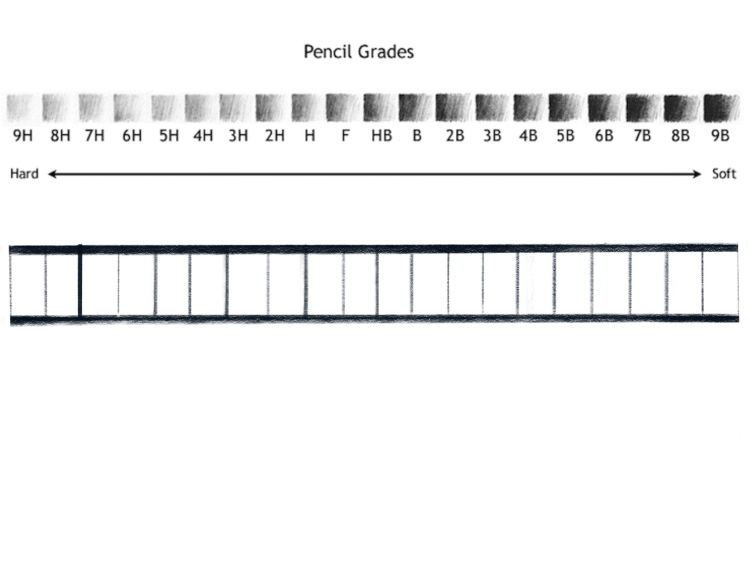
One way is to take your pencils and create a grid such as above and draw boxes and then shade in the box starting from 9H soft to 9B

Tools help us to create. Using tools such as graphite pastels, charcoal pencils and pastels. We can create forms with lines or shapes using light shades or dark shades This is the fundamental part of creating depth and details in our drawings.

Take your pencils and create a grid such as above and draw all boxes and then shade n the box starting from 9H soft to hard , then 8H…

The harder you press your pencil the darker the shade or value in the drawing. The softer you use the pencil, charcoal or pastel, the lighter the shade or value in the drawing

Still, to draw we need tools. Eraser, pencil sharpener, smug paper, fine sandpaper, ruler and a paint brushes to soften the lines and shadows. We also need a surface such as paper or other mediums.

The H stands for hard graphite
The B is for soft graphite or Black
The numbers refer to the harder or softer your graphite is
HB is your middle mixture

Take your pencils and create a grid such as above and draw all boxes and then shade in the box starting from 9H soft to hard , then 8H…

Drawing exercises that were encouraged every day for my daily journal at school were to draw the outline of an object without looking at your paper. It does not look pretty but it helps you to develop a better control of the pencil.

This page is 40 yrs old . This project was to draw straight lines and circles by hand. No Ruler. This was a weekly assignment.

Our Art teachers theory was if Aztecs could draw a straight line without a ruler why can’t we. Mind you, our first couple of months the lines were somewhat squiggly in most parts. and our circles were interesting, but near the end of the year you could produce this with No Ruler

DIGITAL CAMERA

Lesson 3

There is looking & There is seeing

She quietly takes in all the gently words

Artist Jean Honoré Fragonard purposely created this painting as it is. He focused on her facial features and the intensity of the young lady as she was focused on something and pondering, just as her Artist was focusing on her.

The Artist Henry David Thoreau said, ”It’s not what you look at that matters, it’s what you see.

The FIRST and most important tool that we possess for drawing is our EYES. We can see things, but do we actually look at what we are seeing?

The SECOND is developing HAND-EYE COORDINATION helps us to be able to draw what we SEE. This takes time and practice. This is developed in the brain. ( go to …hand eye co-ordination article)

How does our brain come into play? Well we search for…. The lines, the light source, the shadows, the colour of the object and the shape.

Does it have sharp edges or soft edges? What is perspective ?

Why are objects smaller in the background?

Where is the reflection?

Is it a line or a contrast?…

Yes, there is more to Drawing then we thought.

When we are thinking about drawing we tend to talk about our tools. Our techniques our material and colours. This is just the physical act of drawing.

We want to take the time to observe our subject. Find the shapes, forms, shades of colour or lack of and subtleties that fascinate us. 

Lesson 1

Artistic tools seem unending. “The Artists Illustrated Encyclopedia written by Phil Metzger quotes “tools, techniques, material and terms” From abaca fibre to zinc white. (A reference book worth looking into)

The pencil grades from a light value to a very dark value or shade

Today, I would like to focus on the basic tools and techniques that will help you build your skills. We are familiar with pencils and paper so today I would like to introduce the value of shades and the values that they create. If you look below you’ll see a chart and blank squares in a row.

Good quality pencils are a must for an artist. You’ll notice that the pencil grades start at 9H and travel to the right to 9B. The H stands for hard. Yes the graphite in these ones are harder and so they create a softer and lighter value or grade.

The B stands for black. These are a softer type of graphite. The soft graphite helps the artist to make gradual darker aspects to the drawing. Each pencil has a different value or shade.

Start with at least four of the H pencils and four of the B pencil. Create as many boxes that you have pencils. Start in the upper left corner of the box start shading very softly and then press harder as you get to the other corner on the bottom to the left. Have fun. Let me know how you did!

Lesson 2

Drawing is not a talent but is a skill – with good instruction and a willingness to practice, anyone can learn to draw” Brett Eviston

 Yes anyone can learn to draw! This course will help you to develop your skills in understanding how we see and then how to draw it. We will be focusing on Shapes, shading, perspective, reflection and lighting. We will learn how to set up a drawing station that is comfortable and review the tools we will use. We will apply what you have learned to create accurate drawings of landscapes, buildings and things. Also how to develop a portrait using scales to create proportional drawing, shading and texture. The expression “Practice makes perfect” does progressively improve your drawings. How can we do this?  One step at a time!

This was an interesting concept. When I was a small child, it was my mother that introduced me to drawing. She would sit at the table and doodle, a Bonhomme, in English “a man”. I would ask her to do it over and over again. Eventually, she recommended that I try, so I did. Of course, you need to do it over and over again to develop a basic skill.

Different people have different ways to go about this. There are particular skills that we may need to acquire over time. There are technical aspects of drawing. Such as measuring, perspective, shading, drawing, colouring and design. Drawing is an art form and a science.

You can develop your skills in Drawing. How? Practice! Practice! Practice.

As you have seen in the past I have bounced around and focused on different ways to help you know what and how to draw. For instance, look at your surroundings. Then what do you see? We see clouds! Take a good look at the geometric ratio of the clouds. In what way are they viewed from our human viewpoint? Well, the smaller the clouds, the farther the distance is. The larger the clouds, the closer we see them.

Yes, Skills are perfected with time. Each time you try something over a long period of time, you master that skill. Everyday people from all over the world master skills in all sorts of area’s. This involves creative ways to produce something amazing!

So…what will I introduce next?

Wait and see!

Happy Anniversary.

There is a little photo that I have wanted to fix for a while. It was precious. So hopefully it looks good on the wall. First, it was imported and opened in photoshop. Once it was scanned, I deleted the surrounding details. Next, I restored the details remaining. Changed the photo to black and white. Then fixed the details in a soft way. Happy Anniversary! Mom and Dad.

Scan 113260000Eloi and Yvette Bourque 1960 may 28th

There is so much you can do!

Screenshot_2018-04-07-19-01-12
Stevenson habour , Richmond BC. Watercolor on rag paper

There’s so much available to do and little time to do it. But it’s so easy to learn one little trick one at a time. If you get a chance to contact me (which is available on my website at Jacquelineprice.com) there is so much that I can teach you over the phone, in person, or by just reading my blog. Why not take a chance and give me a call. Hope to hear from you.

YOUTUBE VIDEO’S

Sitting down and contemplating whether to create a youtube video was not my life’s ambition nor was it part of my agenda. So why did I do it? Well, perhaps having surgery and being stuck at home for 3 weeks may do it. Adobe has a program available to those who have a subscription to any creative programs so I decided to try one. It is called sparks. Very simple program to create a video or short clips for showing off your work. I like it. It has it glitches that need to be ironed out, but it is simple and easy to upload and put on the youtube channel. I love the preview and music, themes and layouts are nicely presented. Well, It is on line. Check it out.

Canadian Artist Jacqueline Price, Richmond BC (created with Adobe Spark)


ebooks? “How to” Information

I happen to come across this article that I found helpful. This is at KIDLIT411 facebook page. Take a look. It is a series of sites you can access with excellent information to get yourself going with your new ebook. It doesn’t hurt to learn something new. Write me back with your feed back. I would love to hear from you!

Jacqueline price from artyourphotoz.me

http://www.kidlit411.com/2014/01/kidlit411-ebooks-apps_3.html

Latest Art job done 

Well, it was a nice surprise last week a young person phoned and asked if I could do a portrait for him on short notice. We managed to find a really nice picture that could be done and he was happy with the results.

The Girl, by Jacqueline Price©

 I’m going to show you a series of drawings from the beginning to the finished piece. First, we’ll start off with the Box of supplies. Next to the series of pictures the pencil drawing. The first drawing is the outline to set up where everything is. I’d like to start on the eyes I just find that the eyes of the most important part of a portrait. The photos are a little dark as I took them while they were on the easel. The last finished piece is the last finished piece.

I like to jump around. This time I used a soft flat brush to grey out some areas. This one is the line drawing and some under shading with a 4h plus a 2h pencil and strong lines for individual hairs. Once I see this working I move on to another area.

The Girl. Line sketch first and focus on working on the eyes


I now want a textured look for the sleeve.first I brush a soft grey cover on the arm. Next, I do small circles in the lighter pencils and then try a darker overlay of circles. I will draw a soft line area for the different shades

You will notice that I removed a purse strap from her shoulder. I found it made it too cluttered and it did not flatter the overall drawing. I am also starting to focus on the hat.

The brush now comes into play. I add soft shadows in the hat, face and her stomach. Also, I dunked the smear tool into a pile of pencil dust to add soft contrast in the hat.

The Girl. Close up of detail.


This is a close up of the details of layers of the circles and shading.

Well, I left the sweater for last. Most of the work was in the sweater. It looks darker but it is not. It is the light in the room. I am taking care not to loose the necklace in the process of shading the sweater.

Here I am focusing on filling in the shade only.

The Girl. The shading is intensified.


I have it complete but I notice the shape of the sweater needs to be adjusted

Now I need to darken and sharpen all the details. So the face has to be exactly what the client needs to see. The hat, eyes, hair, contrast all has to be just right.

The Girl, by Jacqueline Price ©

And there it is folks…Done

If you are interested in developing the art of drawing, I do teach the concepts that are involved in pencil drawings. First I take the time to look at the work that you are doing right now. Then, I help you to develop qualities in your work that are missing, so that you can get the results that you can be proud of. Also, check out my website for more info jacquelineprice.com

Draw. Draw. draw

Some of us just love to doodle and draw. But time, family, and other odds and ends can change all that for a while. Granma Lever was 72 when she started painting again. She loved to paint and did really well. She also bought a keln and did clay figures and things. It helped her keep busy and many others enjoyed her work…

The reason I am writing this is last evening we went out to the mall and after that went for dinner. I just wanted to doodle..on the papaer table cloth. I took some awsome photos with the phone and just wanted to draw iit. I did a sketch with crayons and the lovely waitresses complimented me. Normally I shyed from drawing in public because I hate to let others see it but you know what, I like to draw and I”m glad I did. One girl recieved  the drawing. Im glad. I hope her mom gets back to drawing. Not for money or show but to just create and draw.